

Simple Podcast Tech Setup for New Creators
Maine Local Archive >> Blogs>> Simple Podcast Tech Setup for New Creators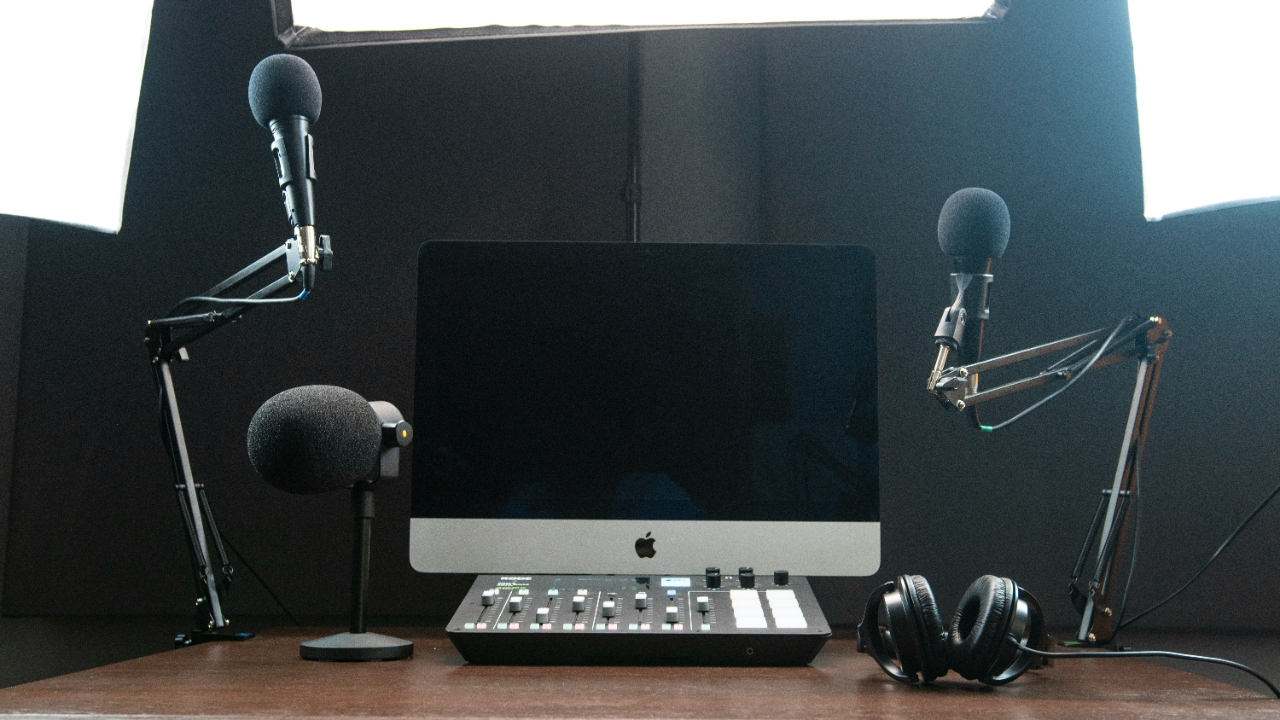
Simple Podcast Tech Setup for New Creators
A new podcast can sound amateur in the first ten seconds, even when the host has a strong idea. The good news is that a smart podcast setup does not need a wall of gear, a soundproof booth, or a budget that makes you sweat. Most new creators in the USA need a clean signal chain, a quiet recording habit, and tools they can use without fighting them every week. That is where many beginners go wrong. They buy the shiny microphone before they understand the room, the file settings, or the editing workflow. A $300 mic in a noisy kitchen still sounds like a noisy kitchen. A $70 mic used well in a calm corner can carry trust. If you are building a show for a small business, personal brand, local audience, or creative side project, your tech choices should help you publish with confidence, not slow you down. Strong creator habits also connect with wider digital visibility, which is why many publishers study online media growth strategies before launching a content channel.
Build a Podcast Setup Around Your Room First
Most beginners treat gear as the starting line, but the room shapes the sound before the microphone ever gets a chance. A spare bedroom in Ohio, a small apartment in Brooklyn, or a garage office in Phoenix can all work if you control echo, background noise, and distance from the mic. The room does not need to look like a studio. It needs to behave like one for thirty minutes at a time.
Why the Quietest Corner Beats the Prettiest Desk
A clean recording space often looks boring, and that is a good sign. Hard walls, bare floors, big windows, and empty rooms push your voice back into the microphone. That bounce creates the hollow sound people associate with beginner podcasts.
Soft material changes the room fast. A rug, curtains, a fabric chair, a bookshelf, and a few thick blankets can reduce echo enough for a new creator to sound far more polished. A walk-in closet can work too, though it can feel cramped during long sessions.
Many creators set up at the most attractive desk because it looks good on camera. That choice can hurt the audio. A less photogenic corner away from the air conditioner, refrigerator, street window, and family foot traffic often gives you better sound with no extra spending.
How a Home Podcast Studio Starts With Control
A home podcast studio begins with repeatable conditions. Record in the same place, at the same distance, with the same mic angle each time. That routine matters because audio editing becomes easier when every episode starts from a similar source.
Small details create control. Turn off ceiling fans, silence phone alerts, close browser tabs that may ping, and tell people nearby when you are recording. In a shared American home, that warning may do more for sound quality than a new accessory.
One counterintuitive trick works well: record a short silence test before speaking. Ten seconds of room tone lets you hear problems before the episode begins. If you hear a dishwasher, traffic, or HVAC hum in that test, the microphone will hear it too.
Choose Podcast Recording Equipment That Solves Real Problems
Gear should answer a problem, not feed the fantasy of becoming a studio engineer. New creators need podcast recording equipment that captures clear voice, stays dependable, and does not require a full Saturday to troubleshoot. The best starter kit is usually smaller than expected because fewer parts mean fewer failure points.
What New Creators Should Buy Before Upgrading
A beginner should start with one good USB or USB/XLR dynamic microphone, closed-back headphones, a sturdy boom arm or desk stand, and a pop filter or foam windscreen. That setup covers the core needs without turning the first episode into a tech exam.
Dynamic microphones suit many homes because they reject more room noise than many sensitive condenser mics. This matters if you record near a laptop fan, window unit, or busy street. A creator in a Chicago apartment may get better results from a modest dynamic mic than from a studio-style condenser that hears every siren outside.
Headphones are not optional. Closed-back headphones help you catch mouth clicks, cable crackle, clipping, and guest audio problems while recording. Speakers can bleed into the mic, which creates echo and makes cleanup harder later.
Why the Cheapest Fix Is Often Mic Distance
Podcast microphone setup is less about owning the perfect model and more about placing it well. Keep the mic close enough for warmth but not so close that every breath turns into a blast. For many voices, four to six inches from the mouth works as a practical starting point.
Angle the mic slightly off to the side rather than straight into the center of your mouth. That simple move softens plosives from words with “p” and “b” sounds. It also makes the recording feel less harsh without adding a plugin.
The quiet truth is that posture affects sound. If you lean back, turn your head, or drift away from the mic while thinking, your voice changes. A boom arm helps because it brings the microphone to you instead of forcing your body toward the desk.
Make Recording Simple Enough to Repeat Every Week
A show grows when recording feels manageable. Many new creators build a setup that works once, then dread using it again because the steps feel messy. The better path is to create a repeatable workflow that protects your time, your files, and your energy.
How to Record Solo Episodes Without Making a Mess
Solo episodes need a simple recording path. Use one microphone, one recording app, one folder system, and one naming rule. That sounds plain, but plain keeps you publishing when life gets busy.
A practical file name might include the show name, episode number, and recording date. For example, a small business owner in Texas could save a file as “localgrowth-ep004-2026-06-10.wav.” That habit prevents the panic of five files named “final audio new new.”
Record in WAV when possible because it gives editing software more audio detail to work with. Export the final episode as MP3 after editing. That split keeps the working file clean while giving listeners a file that works well across podcast platforms.
How Remote Guest Audio Can Stay Clean
Remote interviews bring a different problem: you cannot control the guest’s room. You can still guide the session. Send guests a short note before recording that asks them to use headphones, sit in a quiet room, and avoid laptop speakers.
A separate-track recording tool helps when one person speaks louder than the other. It also makes edits cleaner because you can adjust each voice on its own. This matters when your guest joins from a busy kitchen or a home office with hard walls.
Ask guests to record near soft items if they do not own gear. A couch, curtain, or bed can tame echo better than a blank office wall. It sounds odd, but a guest sitting near a closet door full of clothes may sound more natural than a guest in a sleek conference room.
Edit With Tools That Protect the Listener’s Attention
Editing should make the listener feel cared for, not tricked. The goal is not to remove every breath or make the host sound like someone else. The goal is to reduce distractions so the idea can travel without bumps.
What Audio Editing Software Should Do First
Audio editing software should help you cut mistakes, balance loudness, reduce noise, and export clean files. New creators do not need the most complex tool on day one. They need one they can open without hesitation.
Descript, Audacity, GarageBand, Adobe Audition, and similar tools can all work, depending on budget and comfort. The tool matters less than the workflow. Learn trimming, volume adjustment, noise reduction, and export settings before chasing advanced effects.
Bad editing often comes from doing too much. Over-cleaned audio can sound thin, metallic, or lifeless. A few natural pauses help the listener trust the speaker. Silence is not always a flaw. Sometimes it gives the thought room to land.
How to Keep Your Final Episode Consistent
A finished episode should not blast one listener and whisper to another. Consistent loudness makes your show feel professional across earbuds, car speakers, and smart speakers. Many creators lose trust here because every episode comes out at a different volume.
Create a short export checklist. Confirm the intro music is not louder than the voice, remove long dead air, listen to the first two minutes, check the final minute, and save a backup copy. This habit catches more problems than fancy plugins.
Podcast recording equipment also needs basic care after editing. Coil cables loosely, keep the microphone covered, and avoid leaving gear near drinks. A spilled coffee can end a recording day faster than any software crash.
Publish With a System That Makes Growth Easier
Publishing is where your technical choices meet the real world. A clean episode file, clear title, strong show notes, and steady release process help listeners decide whether to return. New creators often obsess over launch week, but a podcast earns trust through rhythm.
How Hosting Platforms Fit Into the Workflow
A podcast host stores your audio and sends it to listening apps through an RSS feed. This is different from a website host. You upload the finished episode once, then the feed carries it to places like Apple Podcasts, Spotify, and other directories.
Pick a host that gives you clear analytics, easy episode uploads, and simple distribution tools. A local real estate agent, a fitness coach, or a nonprofit director does not need a complex dashboard if the show only needs steady publishing and basic audience data.
Show notes also matter. Write a useful episode description, add guest links when needed, and include a clear next step for the listener. The episode page should help someone decide within seconds whether the conversation fits their need.
Why Simple Promotion Beats Random Posting
Promotion works better when it follows the episode’s strongest idea. Pull one useful point from the recording and turn it into a short social post, email note, or website excerpt. Random “new episode out now” posts rarely give people a reason to care.
Short clips can help, but only when the audio and caption make sense without full context. A creator in Atlanta teaching beginner finance could clip one practical tip about budgeting, then point listeners to the full episode. The clip should stand alone before it sells the show.
A smart home podcast studio supports this habit because consistent sound makes repurposing easier. When each episode has clean audio, you can turn parts of it into clips, quotes, newsletters, or blog sections without fighting quality problems every time.
Conclusion
Podcasting rewards people who can keep showing up with clarity. The best gear is the gear that helps you record again next week without dread, confusion, or another emergency purchase. A strong podcast setup starts with a controlled room, a dependable mic position, a clean recording habit, and editing choices that respect the listener’s time. New creators in the USA have more tools than ever, but that abundance can become a trap when every upgrade looks urgent. Most shows do not fail because the microphone was too cheap. They fade because the process felt heavy. Build a setup you can repeat on a normal Tuesday night after work, when energy is low and the idea still deserves to be recorded. Start with one episode, listen honestly, improve one thing, and publish the next. That steady loop is where your voice gets sharper and your show starts to feel real.
Frequently Asked Questions
What is the best beginner podcast microphone for new creators?
A USB or USB/XLR dynamic microphone is often the best starting point because it handles home noise better than many sensitive condenser mics. Look for clear voice capture, stable drivers, and easy setup rather than chasing the most expensive model.
How much podcast recording equipment does a beginner need?
A beginner needs a microphone, closed-back headphones, a stable stand or boom arm, and basic recording software. Extra gear can wait until the show has a rhythm. Buying less at first also makes troubleshooting easier.
Can I build a home podcast studio in a small apartment?
A small apartment can work well when you choose a quiet corner and add soft surfaces. Rugs, curtains, bookshelves, and blankets help reduce echo. The goal is not silence. The goal is controlled sound that feels clean to the listener.
What audio editing software is easiest for podcast beginners?
Beginner-friendly tools include Audacity, GarageBand, Descript, and similar editors with simple cutting and export features. Choose the one you can learn fast. Clean editing habits matter more than owning the most advanced program.
How do I make my podcast microphone setup sound better?
Place the mic four to six inches from your mouth, angle it slightly off-center, and speak at a steady distance. Use headphones while recording so you can hear problems early. Room noise control also improves the result fast.
Should new podcasters record video and audio together?
Audio should come first if the show depends on listening platforms. Video can help promotion, but it adds lighting, camera, storage, and editing work. Start with strong audio, then add video when your recording process feels stable.
What file format should I use for podcast recording?
Record in WAV when your software allows it because it keeps more audio detail during editing. Export the finished episode as MP3 for publishing. This keeps your working file clean while giving listeners a practical download size.
How can I keep podcast episodes sounding consistent?
Record in the same room, use the same mic distance, keep settings unchanged, and follow an export checklist. Listen to the opening and closing before publishing. Consistency comes from repeatable habits, not constant gear changes.
Related Post

Top Sacramento Political Stories Making State Headlines
Sacramento can feel distant until one vote, one budget cut, or one courtroom fight reaches…